GPU加速原理
网页的渲染过程
1. 获取dom 分割成多个层
2. 对每个图层的节点计算样式结果 (Recalculate style)
3. 为每个节点生成图形和位置 layout
4. 将每个节点绘制并填充到图形的位置中 paint
5. 图层作为纹理上传到GPU
6. 符合条件的多图层生成屏幕的图像  Composite layer 合成层
7.浏览器渲染过程 layout -> paint -> composite layer (触发的阶段越高,代价越高)

独立的层 -->重排重绘 不会影响父层
哪些些会生成独立的层
1. 根元素 position transform 半透明 canvas video overflow 滤镜...
哪些属性可以开启GPU加速
 - 虽然生成独立的层,但是还是cpu一直在计算重绘重排,再传到GPU 进行合成
- 开启GPU加速后 就省去CPU重排重绘的过程 GPU(图形处理器)擅长图形处理   (gpu.js)
- css3d video webgl transfrom css滤镜 flash z-index大于某个相邻节点的layer元素...
硬件加速(GPU加速)
- 术语:Texture 即CPU传到GPU的一个Bitmap
- GPU 能对 快速对Texture 进行 偏移 旋转,缩放,修改透明度等
- 节约了
    1. CPU进行layout paint 的时间
    2. CPU上传位图的时间
CPU VS GPU
- 相同:都有总线与外界联系,有自己的缓存体系,以及数字与逻辑运算单元,两者都是为了完成计算任务而设计的
- 不同:CPU 主要处理操作系统和应用程序 GPU主要处理跟显示相关的数据处理, GPU的活一般CPU都能干,但是效率低
layer模型
- 浏览器根据css属性生成layer
- 将layer作为Texture上传GPU
- 当改变layer的transfrom opacity 等属性,渲染会跳过 layout paint 直接通知GPU做出改变
重绘
- border-raduis box-shadow color ...
重排
- 跳过优化(浏览器对重排有一定的优化,合并多次重排)读取 offsetTop scrollTop width clientWidth getComputedStyle() getBoundingClientRect()
- 删除位置 大小 盒子
- 读写分离 fastdom.js
var h = document.getElementById('h').clientHeight //写操作放到下一帧 (假如下一针有大量的操作,requestAnimationFrame会自动调整帧数从60FPS降到30FPS,不会导致丢帧) requestAnimationFrame(function(){ xxx.style.height = h*2 })- display:none -> block 重绘重排 visibility:visible -> hidden
直出
- SPA单页面:访问html文件 -> 初始化路由 -> 找到对应跟路由 -> 找到对应组件 ->发请求 发给后端再渲染 导致白屏
- SSR + SPA 用户访问到网站直接吐html
- 多页转单页 pushstate技术 a/b ->c/d 检测到路由变化向后台发请求 如果header是ajax 就是单页,不是render
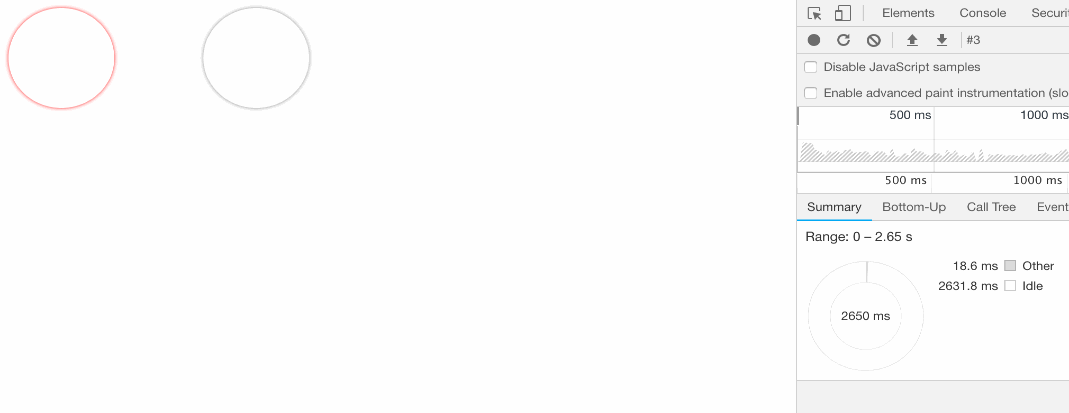
TIP
请打开chrome工具对比 preference timeingline
对比 preference timeingline
<!DOCTYPE html>
<html lang="en">
<head>
    <meta charset="UTF-8">
    <title>Document</title>
</head>
<style>
    .container {
        position: relative;
    }
    #ball,#ball2 {
        position: absolute;
        border-radius: 50%;
        box-shadow: 0 0 5px 0 red;
        width: 100px;
        height: 100px;
    }
    #ball2 {
        box-shadow: 0 0 5px 0 gray;
    }
    .run {
        animation: running-circle 3s infinite;
    }
    .run2 {
        animation: running-circle2 3s infinite;
    }
    @keyframes running-circle {
        0% {
            top: 0;
            left: 0;
        }
        25% {
            top: 0px;
            left: 200px;
        }
        50% {
            top: 200px;
            left: 200px;
        }
        75% {
            top: 200px;
            left: 0px;
        }
        100% {
            top: 0px;
            left: 0px;
        }
    }
    @keyframes running-circle2 {
        0% {
            transform: translate(0,0)
        }
        25% {
            transform: translate(0,200px)
        }
        50% {
            transform: translate(200px,200px)
        }
        75% {
            transform: translate(200px,0)
        }
        100% {
            transform: translate(0,0)

        }
    }
</style>
<body>
    <div class="container">
        <div id="ball"></div>
        <div id="ball2"></div>
    </div>
    <script>
        let ball = document.getElementById('ball')
        ball.classList.add('run')
        let ball2 = document.getElementById('ball2')
        ball2.classList.add('run2')
    </script>
</body>
</html>
TIP
ball分析
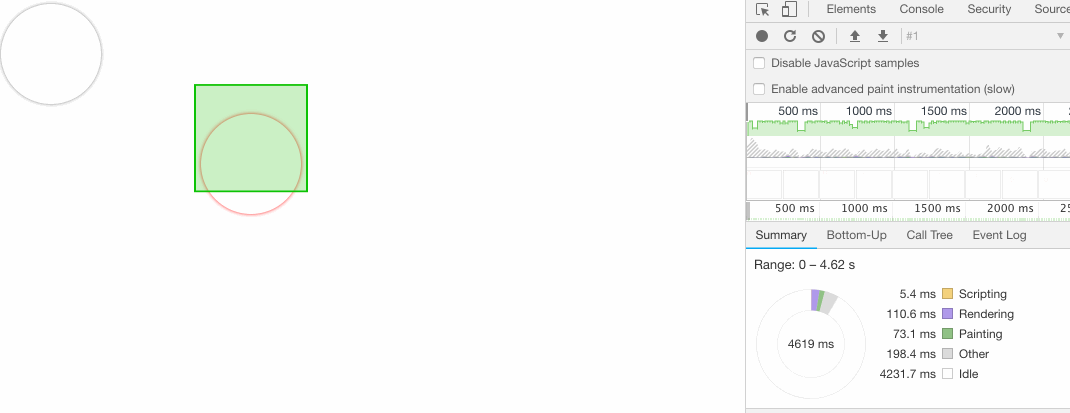
TIP
ball2分析